Tuesday, 10 April 2012

Gevey Works on iPhone 4 Running iOS 5.1 with Preserved Baseband

Whenever Apple seeds a newer iOS update, the only two things that users are concerned about are whether the newer iOS can be jailbroken & whether an unlock is available for iPhone on that update.
iPhone 4
[via Flickr]
Apple recently released iOS 5.1 to the public. And the good news is that, it still can be jailbroken. But the bad news is that the jailbreak is currently tethered & is available only for non A5 devices including iPhone 4, iPhone 3GS, iPod Touch 3G/4 and iPad 1. iPhone 4S and iPad 2 owners still have to wait.
Also, if you’re an iPhone 4 user relying on Gevey unlock, then here’s another good news for you. Gevey sim works on iOS 5.1 while preserving the baseband. If you want to use Gevey, your baseband must be 04.10.01, 03.10.01 or 02.10.01. Currently, there’s no Gevey unlock for 04.11.08. ApplenBerry is still working on it.
Follow one of these 2 tutorials to preserve baseband and create custom iOS 5.1:
Here are two screenshots of iPhone 4 running on Gevey sim:
Gevey iOS 5.1 Gevey - iPhone 4 - iOS 5.1
If you’re using Gevey Ultra, you can install FuriousMod 2.0 from Cydia to automate the 112 procedure and get untethered unlock. But note that the jailbreak for iOS 5.1 is tethered and you’ll need to boot your iPhone in tethered mode if it turns off.

Note for iPhone 4S users:

There’s currently no low level bootrom exploit for iPhone 4S. And iOS 5.1 on iPhone 4S cannot be jailbroken currently. Hence you cannot preserve the baseband on iPhone 4S. So if you’re using a locked iPhone 4S and using R Sim or Gevey Ultra S to unlock it, better stay where you are.

[How To] Preserve Baseband & Update to iOS 5.1 using sn0wbreeze 2.9.2


Last week, Apple released iOS 5.1 which provides some bug fixes & battery improvements. If you’re one of the kind who likes to stay updated to the latest firmwares, then this post is for you.
If you own a locked iPhone 4 or iPhone 3GS, then you must create a custom firmware which will preserve the baseband. I already blogged about how redsn0w can be used to preserve the baseband and create custom iOS 5.1. redsn0w doesn’t provide any function to hacktivate the iPhone, in case you don’t have original carrier’s sim. sn0wbreeze can be used for this purpose.
The jailbreak for iOS 5.1 is currently tethered for iPhone 4 & iPhone 3GS (New Bootrom). For iPhone 3GS – Old bootrom, the jailbreak is untethered.

How To Preserve Baseband & Update to iOS 5.1 using sn0wbreeze 2.9.2?

Step 1: Download iOS 5.1 for your iPhone 3GS/iPhone 4
Step 2: Download sn0wbreeze 2.9.2 & launch it
sn0wbreeze 2.9.2
Click Ok on the Welcome screen. Then sn0wbreeze will show you the IPSW Selection screen
sn0wbreeze - IPSW Selection
Step 3: Browse for iOS 5.1 IPSW & select it
sn0wbreeze 2.9.2 - Browse IPSW
sn0wbreeze will verify the IPSW file. If it throws any errors, make sure to verify the MD5 sum of the IPSW file.
sn0wbreeze - Verify IPSW
Click the Next arrow if everything is fine.
Step 4: sn0wbreeze will now ask you to select one of the modes.
sn0wbreeze - Select Mode
Here’s what each of the mode does:
  • iFaith Mode: This mode creates a custom, pre-activated IPSW using saved SHSH blobs
  • Simple Mode: This mode jailbreaks the iOS & installs basic jailbreak functions including Cydia. This mode doesn’t hacktivate
  • Expert Mode: This mode lets you install Cydia, OpenSSH, and also lets you hacktivate the iOS, in case you don’t have original carrier’s sim
  • Baseband Preservation Mode: This mode just preserves the baseband & doesn’t jailbreak or hacktivate the iOS
Note: All the modes of sn0wbreeze preserve the baseband.
Select the appropriate mode. For this tutorial, I’ve selected the Expert Mode.
Step 5: Once you select Expert Mode, click General & click the Next arrow
sn0wbreeze 2.9.2 - Expert Mode
Here you can select the hacktivate option, install SSH, etc. You can leave the root partition size as it is. Select the appropriate options and click Next arrow.
sn0wbreeze 2.9.2 - hacktivate
If you want to install Custom packages, you can do it on this screen. Skip if you don’t want to install any packages or download & integrate the packages in the iOS. Click Next arrow once done.
Step 6: Select Build IPSW & click Next
sn0wbreeze - Build custom iOS 5.1
sn0wbreeze will start building custom iOS 5.1. Wait for a few minutes
Once done, sn0wbreeze will save the custom iOS 5.1 along with iBooty on Desktop
sn0wbreeze iOS 5.1
Step 7: Click Done in sn0wbreeze & then it will prompt you to put your iPhone into Pwned DFU mode
sn0wbreeze Pwned DFU mode
Connect your iPhone to PC & switch it off. And then click Start in sn0wbreeze. Follow the instructions on the screen to put your iPhone into Pwned DFU mode.
Step 8: Once your iPhone is in Pwned DFU mode (black screen), launch iTunes & press Shift + Restore. Point iTunes to the custom iOS 5.1 saved on Desktop.
iTunes will verify the restore from Apple’s servers and update your iPhone 4 or iPhone 3GS to custom iOS 5.1. The baseband will be preserved and you can use Gevey unlock or ultrasn0w.
Note: If you jailbroke iOS 5.1 using sn0wbreeze, then you must use iBooty to boot your iPhone in tethered mode. iBooty is present on your Desktop/
If you’ve any queries, feel free to ask below.

3 Ways to Spruce Up your Android’s Security


Our androids are the pride and joy of our lives. It’s not just a phone, it’s our picture album, our email inbox, our video collection, our appointment book and god knows what else. The plethora of things that we manage to use our android for is amazing – and scary. How do you make sure that you keep all that data safe? Better yet, how do you make sure that all that data stays safe if your phone is stolen or lost? You can pretty much idiot proof your phone from theft and loss in three different ways. You can resolve all such issues via android monitoring app.
Secure your Android Mobile/Tablet
[Photo via Flickr]

Beef up your passwords

In case you lose your phone or someone takes it the first order of business should be to make sure that they don’t get their hands on any of your data. Apps such as Keeper can help create passwords that are extremely secure. You don’t have to type your passwords over and over again and avoid someone stealing them. The app can help keep your phone safe from hackers as well and keeps all your records encrypted. If you can’t keep someone from taking your phone then at least make sure that you keep them out of your phone.

Get an anti-theft app

If someone manages to swipe your phone while it has an app like the AntiDroid Theft or Cerberus on it, then they won’t be able to run that far. If they manage to change your sim with another for their own use, the app will tell you. In addition, it’ll also turn your phone’s camera into a spy cam so you can use their own pictures as evidence that they’ve got your phone. With the app on your android you won’t have to worry about figuring out where the phone went, at least. It’s easy to use so if you’re not a tech geek you won’t have to worry about finding your way around the three different options. Cerebrus will additionally let you swipe your phone’s memory clean so the phone thief won’t be able to access your private data.

Monitor your own phone

You can monitor your own phone with something like the android monitoring app. Yes, most people use them to spy on other people. A growing number is now turning to the app to try and keep their own data safe. Essentially the android monitoring app works by transmitting emails, texts, pictures, videos, appointments and a whole host of other things from the phone to an online account for the installer’s review. But if you end up installing it yourself what this basically does is keep your data safe for you. So if you manage to drop your phone into the toilet at least you won’t have to worry about frank’s birthday bash pictures going down the drain. In addition, if a thief makes away with your phone you can simply track the jerk all the way to his grandmother’s garden with the GPS tracking option you get from the app.

Saturday, 7 April 2012

Project Glass from Google - A New Step in Tech Revolution


A group from Google[x] has started a project for bringing up Project Glass which will be the new technology innovation and revolution, well many concepts are already been made, many more company are trying to bring something like these gadgets but now when Google is upto something so you can already wonder if what possibilities are to be explored. So below are images we got from the official Google+ Page you can check those too.
google-project-glass
So Google’s Project Glass is something which will make your interaction with all world so unique that talking to them and responding to their questions will be just a fun. Now with these glasses you can text your friend by just watching a visual of what is being typed as you are dictating, live weather streaming by just looking at those clouds or outer environment and getting all the live traffic feeds and updated on the g by just wearing these awesome trendy glasses.
So it will be a huge fun for anyone adapting this new and innovative way of living and interacting with people your friends and family members. Well GoogleX team has also created an amazing video demonstrating these new glasses right now as a concept check that below.

Thursday, 5 April 2012

How to Make IDM Full Version without Patching


IDM Logo
Recently we posted the Build 15 IDM Version which is the latest and up to date from their official website and it was full version as it was containing a patch executable file which when run automatically patches the IDM but some were commented that the file was a virus but well its totally false report as its just detected but it has no harm on your computer but ok for that one reason I scrambled the internet to get a fine easy solution and I came across HOSTS File trick which will accept below serials and will not reject it.
So just check out the below trick on how to make IDM ( Internet Download Manager ) full version through HOSTS File Trick. The procedure is really easy to follow and you can make this happen just in few seconds.

Follow below steps :

1. Make sure you have installed the latest version of IDM if you do not have it you can download it from the official creators website.
2. Now after you have downloaded and installed the latest version just close the IDM and now go to start menu and make a search for Notepad.
3. Now right click on Notepad and than Run It As Administrator.
4. Now navigate to C: > Windows > System 32 > Drivers > etc. > Hosts.
5. When you are in the etc. folder you might not see any files their as you have click on show all files on the right hand side below.
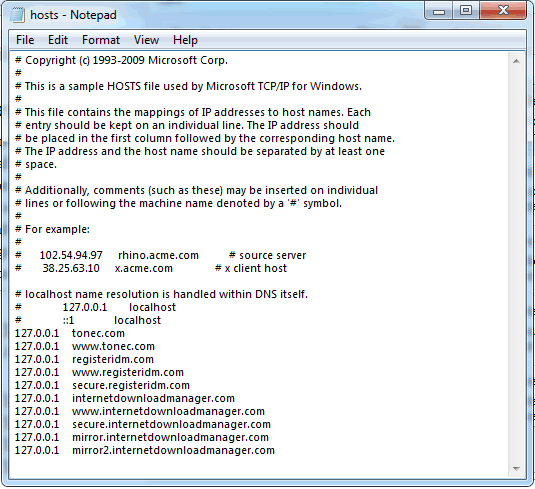
6. Now open the Hosts file and paste all the below lines like in the image.

127.0.0.1    tonec.com
127.0.0.1    www.tonec.com
127.0.0.1    registeridm.com
127.0.0.1    www.registeridm.com
127.0.0.1    secure.registeridm.com
127.0.0.1    internetdownloadmanager.com
127.0.0.1    www.internetdownloadmanager.com
127.0.0.1    secure.internetdownloadmanager.com
127.0.0.1    mirror.internetdownloadmanager.com
127.0.0.1    mirror2.internetdownloadmanager.com


Hosts File
7. So now as you can see in the above image how I have pasted all the lines @ the end of the Hosts file, you have to do same as above, now hit save.
8. Now when you have saved the HOSTS File you can simply enter any serials from below in your IDM Registration page.

RLDGN-OV9WU-5W589-6VZH1
HUDWE-UO689-6D27B-YM28M
UK3DV-E0MNW-MLQYX-GENA1
398ND-QNAGY-CMMZU-ZPI39
GZLJY-X50S3-0S20D-NFRF9
W3J5U-8U66N-D0B9M-54SLM
EC0Q6-QN7UH-5S3JB-YZMEK
UVQW0-X54FE-QW35Q-SNZF5
FJJTJ-J0FLF-QCVBK-A287M


9. Now enjoy your full version IDM without purchasing or patching its totally genuine and totally legal, you can update and it will still work like a charm so if you still have any queries than make sure to comment below.

Wednesday, 4 April 2012

Remove Write Protection on USB Drive & Memory Cards


write-protected-driveMany times using your portable devices you get errors like the disk is write protected like in the image on the right hand side. So this can happen anytime due to virus attacks or anything can be the cause. So recently I got main from one of my reader named soundararajan so he was asking that his 2GB card has become write protected so what he can do, well there are two ways you can try to remove its write protection so check them below.
Firstly I will recommend checking for any physical lock on that card or USB, because many times company’s provide a lock write attached to the card for making it write protected, so check that up make sure its off and than also if you are not able to copy stuff to your card than follow below methods.

Removing Write Protection Using Registry Editor :

Well this is most preferred way of removing write protection as it does not include any formatting of disk or memory card. So you just have to manipulate a .reg key and that’s it.
1. Open Registry Editor by navigating to Star Menu > Run ( on windows 7 search for Run in start Menu ) now type “regedit” and you will see your Registry Editor opened.
2. Now Navigate to the following path :
HKEY_LOCAL_MACHINE\SYSTEM\CurrentControlSet\Control\StorageDevicePolicies
Now if you are not able to see the StorageDevicePolicies than no problem just download this .Reg File and double click on it, now restart your computer and you will have Storage DevicePolicies.
3. Now double click on the WriteProtect and make its value 0 and than click OK.
4. Now just close registry editor and restart your computer for changes to take effect, now plug your memory card or USB in and enjoy non write protected memory card.

Removing Write Protection Using Apacer Formatting Utility :

Now if you are not able to remove write protection from your Memory Cards or USB Drives using the above method than you can go for Apacer Formatting method which simply works quit good.
Now this method needs your card or USB Drive to be formatted so make sure that you have copied all the data from your USB Drive to your computer, now follow steps from below and have fun.
1. Download Apacer Formatting Utility to your computer, make sure its not kept inside the USB Drive just keep it anywhere outside where you can remember.
2. Now extract it and than plug your pen drive or memory card in to your computer and than double click on the Start.bat file present inside the folder you just downloaded. Now this step will start formatting your drive or card so let it do its work till you figure out that formatting is done.
3. Now try checking out if your card has been free from the write protection, well this will surely do its job and you can enjoy copying any files or folders to your drive.
So now these two methods will help you in fixing your USB Drive or Memory Card easily, but still if you are unable to remove write protection from your drive than their might be some hardware problem or something, make sure to contact your retailer and get it replaced.

Take Virtual Tour of The White House using Google Maps


If you have ever dreamed to see how exactly White House looks from inside, and what are the real assets kept inside the worlds most powerful person than now you check and clarify all your doubts with the help of Google as they have created a live project that’s that was focused at creating a live experience for all of you who wanted to watch White House from inside.
The-White-House-Google-Maps
So now this is done using the earlier street view which you have seen on Google Maps, so they have covered all the areas of the White House using this technology and hence giving you a chance for personal inspection, well so why not jump right into this adventure and see The White House right on your screen sitting on your couch so you can check the direct link below which points to the The White House on Google Maps so have fun and enjoy this amazing tour, Visit Google Maps